

Estimated Cost
$282.62
(See detailed material list below.)
Dimensions
Headboard = 79 inches wide by 60 inches tall (note: it will be a little wider with the fabric and batting)
Bed Frame Dimensions = 86 inches deep by 79 inches wide by 15 inches tall.

Tools
- Table Saw
or Circular Saw
- Miter Saw
- Kreg Jig
- Jig Saw
- Band Saw
- Drill and Driver
with drill Bits
See the detailed materials list below

Cut List


Step 3
Then I went ahead and cut the arches out with the Jig Saw .
.

Step 4
I then used the Kreg Jig to drill the holes in the plywood where we would attach the posts to the headboard. Use 1 inch coarse thread kreg screws to attach the ½ inch plywood to the posts.

Step 5
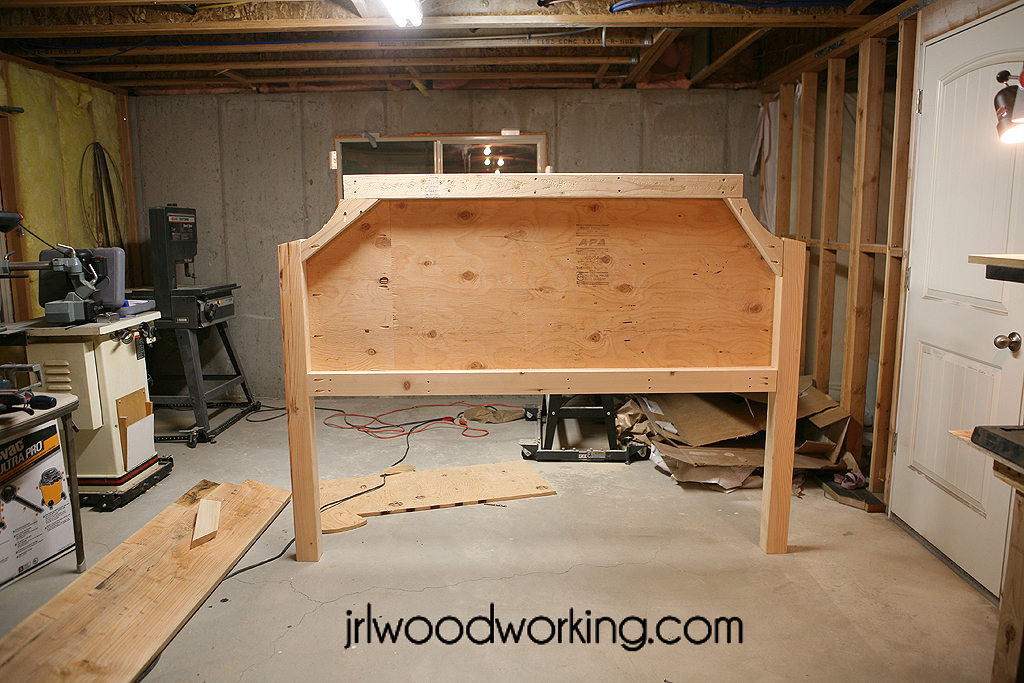
We then got to work building the frame to go around the headboard. We needed to build the edges out a bit so we had a nice thick area to wrap the batting and fabric around and a spot to staple them too. We stacked two 2x4s around the plywood (since we used ¾ inch plywood instead of ½ inch, we had to run one of them through the planer to make it a little thinner). The bottom 2x4s were cut at 72 inches and the top 2x4 were cut at 61 inches. We drilled
holes for 2 ½ inch coarse thread kreg screws at each end of the 2x4 pieces. We then drilled
3 inch wood screws from the plywood through the stacked 2x4s.


Step 6
We used the arch piece we had cut off the plywood as a template for the 2x4's that go in the corner.


Step 7
Next, we measured out where we wanted the buttons to go. See the layout below. I marked them with a piece of blue painter's tape so I could stand back and make sure I liked how they looked. I did, so then we peeled off the tape and drilled a hole where each button will go.


Step 8
Once I had the holes drilled
, I stained and sealed the posts of the headboard. After the posts were stained and sealed, I put the 2" thick foam down on the headboard and cut to the same shape. I used spray adhesive to give it a little bit of stickiness to hold it into place. I then poked a needed through each hole for each button and marked where they went on the foam. I went around to each button spot and cut out a quarter sized hole.


Step 9
We ran the batting around the headboard. I was a tiny bit short on batting (I wanted to do it double thick, otherwise I would have had plenty) but we made it work.


Step 10
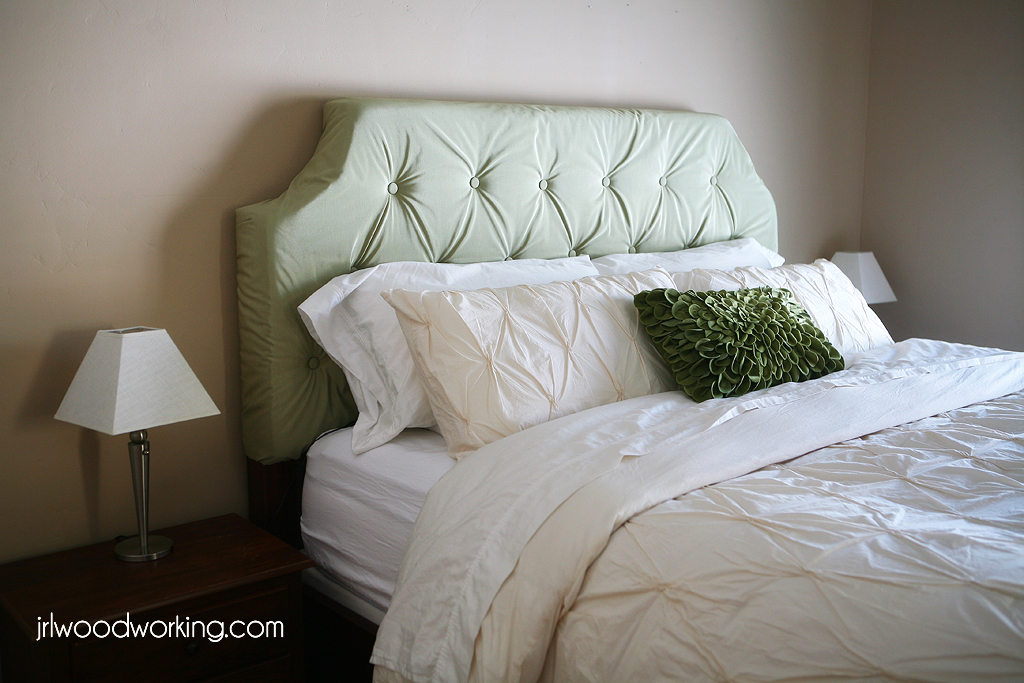
We started the tufting. We put the fabric over the headboard and got it lined up nicely. The tufting took a little bit of time, but once I figured out a nice system it went fairly quick. I would run a long upholstery needle, threaded with upholstery thread (doubled), through the button hole at back of the headboard. I would pull it out the front, run my button through the needle, and then feed the needle back through the headboard. The trickiest part was being able to line it up perfect and find the hole again. Once I had the needle fed back through, we'd pull the string nice and tight and use the pneumatic staple gun to hold it into place. We'd run the thread several directions and staple it into place several times to make sure it was tight.

I looked at several websites to learn how to tuft. Similar to this one:
http://www.addicted2decorating.com/how-to-make-a-diamond-tufted-upholstered-headboard.html
Step 11
Once we finished the tufting, we just wrapped the fabric around and we used the pneumatic staple gun to staple it into place. A hand-held staple gun will work, but the pneumatic stapler was so much easier!


Once everything was in place we trimmed off the excess material.
Step 12
After the headboard was completely finished, we got to work on the bed frame. We cut two 2x10 side rails at 79 inches and the footboard rail at 72 inches. We cut two 4x4 pieces at 15 inches tall. We also cut two 4x4 posts at 5 ¾ inches. We then marked the 15 inch 4x4 posts to cut a bevel. I set the Table Saw
at a 45 degree angle and ran the 4x4 most of the way through and then turned off the saw. I finished the 45 degree angle with the Band Saw and a 45 degree home-made jig.


Step 13
We sanded and then we stained and sealed those pieces. It takes awhile to finish this step, since we had to wait 6 hours between each coat. Finally, we finished all the staining and sealing. TJ used the Kreg Jig
to drill pocket holes on both sides of the rails.

Step 14
We cut out 2x4s for the inside box spring supports. For the side and bottom cleats, I ripped a 2x4 in half on the Table Saw
. I cut them at the same length as the rails.
I think my very favorite part is no longer have a bed skirt! I hate the way bed skirts look like clutter or like they are hiding something (like your box springs or junk under your bed). It's been such a fun project and TJ and I really enjoy spending time together building things.


Instructions
Step 1
I started by measuring and marking the 4x4 side posts the full height of the bed frame (60 inches). I then used the outside point as a midpoint to scribe a 10 inch radius. I then took my scribed 4x4 post and cut the approximate angle on the Miter Saw . I sanded the 4x4 posts in my drum sander. That machine makes sanding easy work! It does a great job and requires almost no effort.
Step 1
I started by measuring and marking the 4x4 side posts the full height of the bed frame (60 inches). I then used the outside point as a midpoint to scribe a 10 inch radius. I then took my scribed 4x4 post and cut the approximate angle on the Miter Saw


Step 2
I cut the ½-inch plywood sheet to 72 inches wide by 33 inches tall. We measured out the angle of the arch for the corner of the bed again by marking an imaginary midpoint and rotating my tape measure marked at 10 inches.
I cut the ½-inch plywood sheet to 72 inches wide by 33 inches tall. We measured out the angle of the arch for the corner of the bed again by marking an imaginary midpoint and rotating my tape measure marked at 10 inches.


Step 3
Then I went ahead and cut the arches out with the Jig Saw

Step 4
I then used the Kreg Jig

Step 5
We then got to work building the frame to go around the headboard. We needed to build the edges out a bit so we had a nice thick area to wrap the batting and fabric around and a spot to staple them too. We stacked two 2x4s around the plywood (since we used ¾ inch plywood instead of ½ inch, we had to run one of them through the planer to make it a little thinner). The bottom 2x4s were cut at 72 inches and the top 2x4 were cut at 61 inches. We drilled


Step 6
We used the arch piece we had cut off the plywood as a template for the 2x4's that go in the corner.

We used the Band Saw
to cut the 2x4s at the same angle as the arch on the headboard. We drilled
the 2x4 pieces together with pocket screws and 3 inch wood screws from the front (plywood side)


Step 7
Next, we measured out where we wanted the buttons to go. See the layout below. I marked them with a piece of blue painter's tape so I could stand back and make sure I liked how they looked. I did, so then we peeled off the tape and drilled a hole where each button will go.


Step 8
Once I had the holes drilled


Step 9
We ran the batting around the headboard. I was a tiny bit short on batting (I wanted to do it double thick, otherwise I would have had plenty) but we made it work.


Step 10
We started the tufting. We put the fabric over the headboard and got it lined up nicely. The tufting took a little bit of time, but once I figured out a nice system it went fairly quick. I would run a long upholstery needle, threaded with upholstery thread (doubled), through the button hole at back of the headboard. I would pull it out the front, run my button through the needle, and then feed the needle back through the headboard. The trickiest part was being able to line it up perfect and find the hole again. Once I had the needle fed back through, we'd pull the string nice and tight and use the pneumatic staple gun to hold it into place. We'd run the thread several directions and staple it into place several times to make sure it was tight.

I looked at several websites to learn how to tuft. Similar to this one:
http://www.addicted2decorating.com/how-to-make-a-diamond-tufted-upholstered-headboard.html
Step 11
Once we finished the tufting, we just wrapped the fabric around and we used the pneumatic staple gun to staple it into place. A hand-held staple gun will work, but the pneumatic stapler was so much easier!


Once everything was in place we trimmed off the excess material.
Step 12
After the headboard was completely finished, we got to work on the bed frame. We cut two 2x10 side rails at 79 inches and the footboard rail at 72 inches. We cut two 4x4 pieces at 15 inches tall. We also cut two 4x4 posts at 5 ¾ inches. We then marked the 15 inch 4x4 posts to cut a bevel. I set the Table Saw


Step 13
We sanded and then we stained and sealed those pieces. It takes awhile to finish this step, since we had to wait 6 hours between each coat. Finally, we finished all the staining and sealing. TJ used the Kreg Jig

Step 14
We cut out 2x4s for the inside box spring supports. For the side and bottom cleats, I ripped a 2x4 in half on the Table Saw
Step 15
I assembled the headboard and bed frame by screwing 2 ½ inch screws into all the pre-drilled
pocket holes. I screwed the cleats flush with the bottom of the rails. I used 2 1/2 inch screws.


Step 16
I field measured the center 2x4 supports and cut them to fit. I used pocket screws to fasten them to the bottom and side cleats and support them with the 5 ¾ inch 4x4 posts.


Step 17
Finished! It took a couple hours to put together, but it was worth it. This frame is so much nicer than the metal bed frame we'd been using.


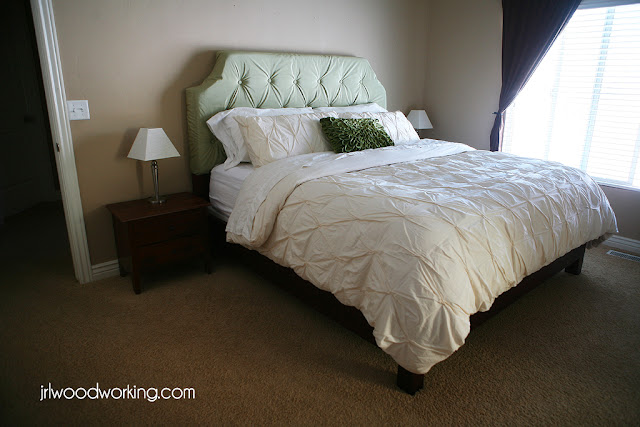

I can't believe how fairly easy it was to build and how much a difference it makes having a headboard in my room. It looks so much more grown up and put together. I'm so happy with how it turned out, especially since it was our first time doing an upholstered/tufted project.
I assembled the headboard and bed frame by screwing 2 ½ inch screws into all the pre-drilled


Step 16
I field measured the center 2x4 supports and cut them to fit. I used pocket screws to fasten them to the bottom and side cleats and support them with the 5 ¾ inch 4x4 posts.


Step 17
Finished! It took a couple hours to put together, but it was worth it. This frame is so much nicer than the metal bed frame we'd been using.


I can't believe how fairly easy it was to build and how much a difference it makes having a headboard in my room. It looks so much more grown up and put together. I'm so happy with how it turned out, especially since it was our first time doing an upholstered/tufted project.
I think my very favorite part is no longer have a bed skirt! I hate the way bed skirts look like clutter or like they are hiding something (like your box springs or junk under your bed). It's been such a fun project and TJ and I really enjoy spending time together building things.
great job you guys!!!!! What color stain did you use?
ReplyDeleteWe used bombay mahogany.
DeleteThanks for taking the time to discuss this, I feel strongly about it and love learning more on this topic. If possible, as you gain expertise, would you mind updating your blog with more information? It is extremely helpful for me. banging headboard
ReplyDeleteYour article has piqued a lot of positive interest. I can see why since you have done such a good job of making it interesting. woodworking plans free to download
ReplyDeletebingöl
ReplyDeleteelazığ
hakkari
sakarya
erzincan
1PAT
kastamonu evden eve nakliyat
ReplyDeleteantep evden eve nakliyat
balıkesir evden eve nakliyat
erzincan evden eve nakliyat
ankara evden eve nakliyat
CN8
DE4FA
ReplyDeletebuy turinabol
dianabol methandienone
sarms
oxandrolone anavar
halotestin
steroid cycles for sale
winstrol stanozolol
order oxandrolone anavar
boldenone for sale
8BDEE
ReplyDeletekarabük kadınlarla görüntülü sohbet
manisa telefonda kızlarla sohbet
edirne sesli sohbet mobil
sesli görüntülü sohbet
hatay görüntülü sohbet kadınlarla
ardahan görüntülü sohbet kızlarla
bayburt canlı sohbet odaları
ücretsiz sohbet siteleri
ardahan sesli sohbet sesli chat
7701D
ReplyDeleteankara görüntülü canlı sohbet
antep telefonda sohbet
balıkesir mobil sohbet sitesi
uşak bedava sohbet odaları
van canlı sohbet et
canlı sohbet siteleri ücretsiz
Adana Canlı Sohbet Ücretsiz
Muş Rastgele Sohbet Siteleri
kayseri görüntülü sohbet sitesi
613445E9CE
ReplyDeletegörüntülü şov
Great and I have a tremendous give: How Much Is A Complete House Renovation whole house renovation cost
ReplyDelete9E6CC61E03
ReplyDeleteig takipçi
B63A0B8CB6
ReplyDeletetakipçi fiyat
A king-size upholstered tufted headboard for upholstered bed can completely transform your bedroom's look, offering elegance and sophistication. If you're planning to upgrade your space, Wooden Street offers stunning options for upholstered headboards, crafted with premium materials and timeless designs. Their tufted headboards not only provide comfort but also add a luxurious appeal to your bedroom. Whether you prefer neutral tones or bold colors, Wooden Street has customizable furniture plans to suit your style and needs. Explore their collection for high-quality craftsmanship and design excellence that complements any interior decor. Transform your bedroom today with Wooden Street's exceptional furniture pieces!
ReplyDelete0D194E1690
ReplyDeleteinstagram gerçek türk takipçi
Explore top-tier comfort with the King Size Bed collection from Elegant Collections. In "King Bed Headboard - Part 1: Design," discover how elegant headboard styles enhance both luxury and functionality for your dream bedroom setup.
ReplyDeleteLove the detailed plans—this king size tufted headboard adds such a classy, custom touch to any bedroom! upholstered bed frames uk
ReplyDelete