


Introduction
Our plans were inspired by Ana White’s Fancy Farmhouse Headboard found here:
http://ana-white.com/2013/04/plans/king-size-fancy-farmhouse-bedRemember how we built a beautiful upholstered headboard and bed frame for our master bedroom a couple of weeks ago? Well, to make a long story short... someone we know wanted us to make them an upholstered headboard and bed frame. We agreed. I went with them and we purchased all the goods to build their headboard. They ended up picking out the exact same material as ours and they wanted the same shape of headboard as well. At the very last minute, I decided that it would be fun to make a different headboard for our room. I loved the upholstered headboard. I didn't love how it looked with my bedding. It all seemed a little too busy and a little too tufted. That probably doesn't make sense to anyone else, but I convinced TJ to play along with me and make a different bed for our room and then we could sell the upholstered headboard we made for our bed to the people who wanted one. I went and returned all the material that I bought to make the other headboard and then I went and bought all the lumber for our new headboard.
TJ ended up taking the day off a Tuesday (thanks to commuting half way to Salt Lake, realizing he didn't have his laptop, calling me to check if it was at home, my phone not working, coming all the way home to get his lap top, realizing it was in his car the whole time, then it turned into taking a personal day and not going in at all), so it ended up being the perfect opportunity to spend some quality time building in the basement.
Estimated Cost
$216.76
See detailed material list below.
Dimensions

Bed Frame Dimensions = 86 inches deep by 79 inches wide by 15 inches tall.
Tools
- Table Saw
or Circular Saw
- Miter Saw
- Kreg Jig
- Drill and Driver
with drill Bits
- Nail Compressor
- 16 gauge and 18 gauge Nail Guns
Lumber and Materials List
See the detailed materials list below
Cut List
See the cutlist diagram shown below.

Instructions
Step 1
We cut the rails and stiles for the center panel. We used a Kreg Jig to fasten the rails and stiles together. We then filled in the back of it with the 1x6 pine pieces cut to fit. We cut the 1x6 pine pieces at 21 1/4-inch and then ripped the last piece to fit.


Step 2


Step 3


Step 5


Step 11
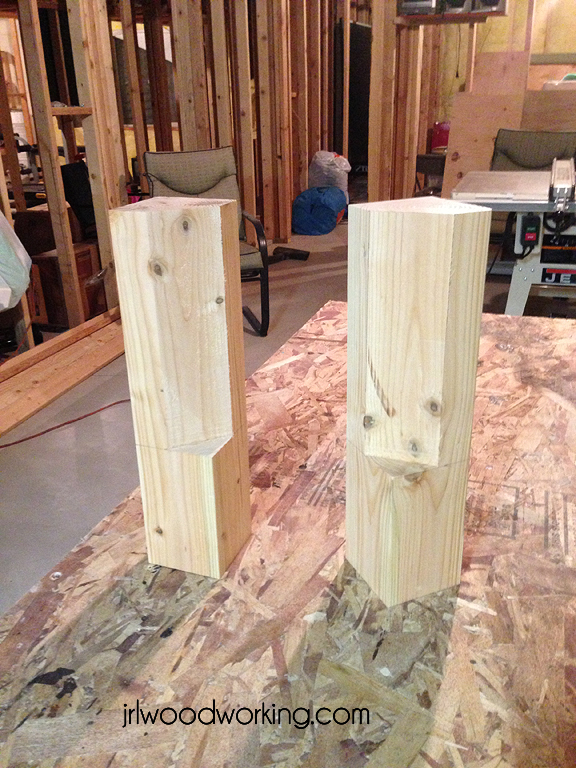
After the headboard was completely finished, we got to work on the bed frame. We cut two 2x10 side rails at 79 inches and the footboard rail at 72 inches. We cut two 4x4 pieces at 15 inches tall. We also cut two 4x4 posts at 5 ¾ inches. We then marked the 15 inch 4x4 posts to cut a bevel. I set the Table Saw
at a 45 degree angle and ran the 4x4 most of the way through and then turned off the saw. I finished the 45 degree angle with the band saw and a 45 degree home-made jig.


Step 12
We sanded and then we stained and sealed those pieces. It takes awhile to finish this step, since we had to wait 6 hours between each coat. Finally, we finished all the staining and sealing. TJ used the Kreg Jig
to drill
pocket holes on both sides of the rails.

Step 13
We cut out 2x4s for the inside box spring supports. For the side and bottom cleats, I ripped a 2x4 in half on the Table Saw
. I cut them at the same length as the rails.


We nailed the 1x6 pine panels to the rails and stiles with a brad nailer and some 1 1/4" brad nails.

Step 2
We measured the inside dimensions of the center panel and then cut our "chair rail" molding to fit (at 45 degree miters). The clear dimension from one side to the other is what the long edge of the miter to the long edge of the miter should be.

We nailed it in with the brad nailer and 1-inch or 1 1/4-inch brad nails. The then filled in the nail holes with wood filler and filled in the miter joints with wood filler. We sanded the miter joints with sand paper after the wood filler dried.

Step 3
We fastened the 2x6 bottom rail to the center panel with 2 1/2-inch Kreg screws . This was done about every 8 to 10 inches. Kristen sanded the joint to make sure it was seamless (or semi seamless).


Step 4
I drilled
pocket holes on the side so we could connect it to the 4x4 vertical posts. I laid it all face down on the floor to ensure the face was flush and then drilled
in the 2 1/2-inch kreg jig screws.


We sanded the seams throughout the process.

Step 5
I built the top piece by mitering the 2x6 and wrapping it around the 3 1/2 inches to go all the way back on the 4x4 posts. I put wood glue in the joint, nailed it with my 16 gauge nail gun (2 to 2 1/2-inch nails) and then clamped it with my crown clamps. We also drilled
some pocket holes in the 2x6 so we could connect it to the main headboard piece.

Step 6
After the glue had dried, we clamped the top piece place and drilled
the 2 1/2-inch Kreg screws
down into the headboard. We had to hold and push the pieces while we drilled
to get them to line up. The top seam was not as tight as the bottom seam, but that's okay because the top seam is cover with a trim piece.


Step 7
We cut the top piece to length and width. Then we held the top piece in place and nailed it down with the 16 gauge nail gun (2 to 2 1/2-inch nails).


Step 8
We measured the top width for the crown molding-looking piece (this is just a chair rail, so it just requires a miter cut on the chop saw). The length was the inside lengths of the miter cuts, so the piece is actually poking out on the ends. We cut one miter cut on each side piece (3 1/2 inches from square end to the inside short end of the miter cut). It's easiest to hold up the piece on the headboard before you cut it and draw the direction of the cut. Then just set the saw to 45 degrees and figure out how you need to hold the wood to get it to match the line you drew.

Step 9
Then we measured and cut the middle trim piece. We couldn't find the middle trim piece we were looking for at Lowe's or Home Depot. All the pieces we found were either not the shape I was looking for or not stain grade material. We ended up going to a cabinet shop and asking if they had what we wanted. They did and an 8-foot piece was only a couple of dollars.

Front of Fancy Farmhouse King Size Headboard

Back of Fancy Farmhouse King Size Headboard
Step 10
After the headboard was sanded and wiped down, we started staining it. We used the same stain as we did on our upholstered headboard, we used a quart of ANT Wal Polyshade bombay mahogany. We put two coats on it.

We already had the bed frame done from our other bed, but we built another bed frame for the upholstered bed we sold. Below are the step for the bed frame:
Step 11
After the headboard was completely finished, we got to work on the bed frame. We cut two 2x10 side rails at 79 inches and the footboard rail at 72 inches. We cut two 4x4 pieces at 15 inches tall. We also cut two 4x4 posts at 5 ¾ inches. We then marked the 15 inch 4x4 posts to cut a bevel. I set the Table Saw


Step 12
We sanded and then we stained and sealed those pieces. It takes awhile to finish this step, since we had to wait 6 hours between each coat. Finally, we finished all the staining and sealing. TJ used the Kreg Jig

Step 13
We cut out 2x4s for the inside box spring supports. For the side and bottom cleats, I ripped a 2x4 in half on the Table Saw
Step 14
I assembled the headboard and bed frame by screwing 2 ½ inch screws into all the pre-drilled
pocket holes.


Step 15
I field measured the center 2x4 supports and cut them to fit. I used pocket screws to fasten them to the bottom and side cleats and support them with the 5 ¾ inch 4x4 posts.
Step 16
Finished! We also decided to buy some feet for the front two posts. Don't you love how it turned out. Thanks Ana White for the inspiration!
Finished! We also decided to buy some feet for the front two posts. Don't you love how it turned out. Thanks Ana White for the inspiration!

I love the reddish stain you used in the final photos...can you tell me what you used and how many coats?
ReplyDeleteWe used the ANT Wal Polyshade bombay mahogany. Two coats.
DeleteWell explain, I am Sharing my personal experience about one of the wood working plan i am using for my project. it contains all woodworking plans include workbench plans, shed plans, chair ... blueprints and detailed instructions for building all kinds of wooden, check out here to download the wood working plans ( http://www.healthandrich.com/2wood )
DeleteAll the best have a great day
Great bed. Great job. Beautiful shop, (and wife)!
ReplyDeleteSerious though - what a shop! Norm Abram might be jealous.
I am researching ideas for our own bed, since we are getting a foam mattress, and our current bed is only a box spring and mattress on top of a metal mattress frame. I'm just curious how the bed is holding up after being used for awhile. Is there anything about how the rails are attached that you'd reconsider, or should I go for the same technique?
Hi rugged ruger. The bed is holding up great so far. We just used pocket screws to attached the rails and it has worked great. The good thing about the pocket screws is that if you notice any sort of squeak, you can back out the screws and drive them tighter until the squeak is gone. Pocket screws obviously are not the best for conveniently disassembling and reassembling the bed frame, but they sure make a solid and tight bed frame. There is a lot of hardware out there for attaching rails to headboards and footboards, so I guess it depends on what you value most--sturdiness or convenience when disassembling and reassembling. We chose sturdiness since we have all the tools to disassemble when we need to.
DeleteTo create this furniture did you use and wooden adhesive? Because I need some wood adhesive for fixing purpose.
ReplyDeleteWe did not use any wood adhesive. I think in order to give you the best advice on which adhesive you want to use we will need to know what you are trying to do? Are you gluing wood to wood? Wood to metal? Wood the glass/mirror?
DeleteThis is absolutely amazing! Very impressed.
DeleteExcellent post and love the photo's for instruction. Great job. Thanks for sharing.
ReplyDeleteI love the bed. I'm going to make it with my husband, but I'll need to put it together in away that I can take it apart. Do you have any ideas of what to use?
ReplyDeleteYes, there are lots of options. Take a look at this website:
Deletehttp://www.rockler.com/woodworking/Bed-Hardware
Hope that helps.
I just saw your reply. Thank you, ill take a look at the web your provide and let you know how it goes.
DeleteThis bed is beautiful, I'm a novice. So pardon my lack of knowledge. I noticed you used a kreg jig to attach the head board to the 4x4 post (pocket holes) . Is that secure and solid ? I notice some plans call for using lag bolts that's are drilled from the center outside of the 4x4 post into the center of the 3/4 inch piece of wood. Is one method better than the other? I would think drilling a lag bolt into the center of a 3/4 inch wide piece of wood would cause splitting... Even if Pre drilled.
ReplyDeleteWhat are your thoughts
Hi Exp. Eddie, We used the 2 1/2" kreg jig screws to attached the rails to the headboard. It is very solid. I think a lag bolt would work too, but they wouldn't be concealed and I would be worried about splitting the wood too. Rockler.com also makes a ton of hardware that you can use to connect the rails to the headboard. The kreg jig screws have worked great for us.
DeleteThank you so much for the quick reply. I'm making this bed for a child (6 and 13 year old) so I need it to be solid. I was thinking that the lag bolts in the side of the of the headboard could possible cause splitting.
ReplyDeleteI will look into getting a kreg jig.
Of course I'm making a full size version, not king
ReplyDeletewhat model kreg jig are you using? k4, k5 etc ??
ReplyDeleteWe have the K4, but I would recommend just getting the Kreg R3 Jr. Pocket Hole Jig System.
DeleteThis bed is the bomb. I liked the tufted headboard, but, love this one. Both of you are so talented, and blessed that you can complete such meticulous projects. (without maiming each other before you finish) ((Oh, I didn't mention that we don't build furniture together, we have built two houses and added two rooms, haha. Still alive and together!!)) You are inspiring.
ReplyDeleteThank you for your kind words!
DeleteI love what you've done with this design. Is there a way to add a foot board and how would I change the measurements of the headboard to make it work or would you recommend against that?
ReplyDeleteYou could absolutely add a footboard if you wanted. The measurements for most everything would stay the same. If I were doing it, I would add two inches to the length of the side rails (making it 81") and then center the footboard planks on the 4x4 posts. I wouldn't bevel or taper the 4x4 posts coming up. Hope that helps.
DeleteThanks for all the details instructions, I am planning on trying this out, I really like the front feet that you used, where did you get them from?
ReplyDeleteHi Jon, we purchased the feet from Osborne Wood Products. They are an online seller of woodworking products.
DeleteAbsolutely Beautiful!
ReplyDeleteNeat
ReplyDeletegreat project. how did you attach the cleats to the rails? did you do this in the field after you attached rails to headboard?
ReplyDeleteWe screwed the cleats to the rails after the rails were attached to the headboard.
DeleteThis comment has been removed by the author.
ReplyDeleteLooks great! I just wish I could find some wood! We had a bunch of old wood pallets but the wood was in horrible shape!
ReplyDeleteBrian
Giving health its due respect and importance, today more homes are shifting to use Foam Mattress. People have realized health is wealth indeed. The few hours that you retire, should be peaceful and relaxing to body and soul. Thus you can keep aches, pains and stiffness away, which is common on the other hard mattresses. memory foam hq
ReplyDeleteVery nice job!!!! Love the color!
ReplyDeletewhat hardware did you use to add feet to the front? Can you explain the process?
ReplyDeleteIt contains all the information you need to start making
ReplyDeletemoney from the very first job...
http://www.woodprofits.com?vhbshygdf398432
Download 16,000 Woodworking Plans & Projects
ReplyDeletehttp://cnnwood.weebly.com
16,000 Woodworking Plans With Step-By-Step Details, Photos, Materials Lists And More!
Arbor Projects ,
Adirondack Chairs ,
Artwork Display ,
Bathroom Unit ,
Box Designs ,
Billiard/Pool Table ,
Barn Plans ,
Bed Plans ,
Bedside Cabinets ,
Bee Hive Plans ,
Bench Projects ,
Bird Feeders ,
Birdhouse Plans ,
Boat Plans ,
Book Case Plans ,
Baby Changing Table ,
Coat Rack ,
Cabin Plans ....
Wonderful illustrated information. I thank you about that. No doubt it will be very useful for my future projects. Would like to see some other posts on the same subject! platform bed headboard
ReplyDeleteLooking at the bed in the photos makes me think that it must be made by a professional woodworker. Seriously, I can’t believe how amazing you guys to complete such a great job. I love the color and how detailing it is when it comes down to cutting out the component. It shows how skillful you are and how you love your house by trying to make a true home with every thing you do. Thanks for sharing.
ReplyDeleteI can’t believe how amazing you guys to complete such a great job using router table . I love the color and how detailing it is when it comes down to cutting out the component.
ReplyDeleteI read your article. Thanks for sharing good information.
ReplyDeleteLiving Room Furniture
Thanks so much for sharing this! Your step-by-step guide was super helpful and easy to follow. As a fellow Augusta fencing contractor, We really admire the care and detail you put into your work. You’ve inspired me to try a similar project at home—great job!
ReplyDeleteYou made the process easy to understand and fun to follow. Great job on the build—it looks amazing! We focus on concrete driveway Clearwater work, but projects like yours remind us how important a solid foundation is in every space. Thanks for sharing!
ReplyDeleteWe love seeing creative projects like this one. As a stamped concrete Port Saint Lucie team, we know how important great design is. We really enjoy your ideas and hope to bring this same care to our own work too!
ReplyDeleteThanks for sharing this! The headboard looks amazing, and your step-by-step story was fun to read. As a fencing contractor Johnson City folks count on, we appreciate great craftsmanship. We really enjoy seeing others build with heart and style like this. Keep up the awesome work!
ReplyDelete